5 Budget-Friendly Custom Patio Cover Ideas That Look Expensive
Table of Contents
1. Introduction
2. Why Choose Budget-Friendly Patio Covers?
3. Idea 1: DIY Pergola with String Lights
4. Idea 2: Fabric Sail Shades
5. Idea 3: Corrugated Metal Roofing
6. Idea 4: Bamboo and Reed Screening
7. Idea 5: Repurposed Pallets Structure
8. Tips for Making Budget Covers Look Expensive
9. Conclusion
10. Frequently Asked Questions
Introduction
Creating an outdoor oasis doesn’t have to drain your savings account. When I first started looking into patio covers for my own backyard, I was shocked by the quotes I received from contractors. Some estimates reached well into the thousands, and frankly, that just wasn’t in the cards for our family budget.
But here’s what I discovered through months of research and some trial and error: you can absolutely create stunning, custom patio covers that look like they cost a fortune without actually spending one. The secret lies in choosing the right materials, employing some clever design tricks, and putting in a bit of elbow grease.
Whether you’re looking to create shade for summer barbecues, protect your outdoor furniture from the elements, or simply add visual interest to your backyard space, these five budget-friendly custom patio cover ideas will transform your outdoor area while keeping your wallet happy.
Why Choose Budget-Friendly Patio Covers?
Before we dive into the specific ideas, let’s talk about why going the budget-friendly route makes sense. First and foremost, outdoor structures face constant exposure to weather elements. Even expensive materials can show wear over time, so starting with cost-effective options allows you to update and refresh your look more frequently.
Additionally, budget-friendly doesn’t mean cheap-looking. With the right approach, materials that cost a fraction of premium options can deliver the same visual impact. The key is in the execution, attention to detail, and understanding how to maximize the potential of affordable materials.
Many homeowners also find that DIY projects give them a greater sense of satisfaction and allow for complete customization. When you’re not locked into expensive contractor packages, you have the freedom to experiment with different styles and make changes as your tastes evolve.
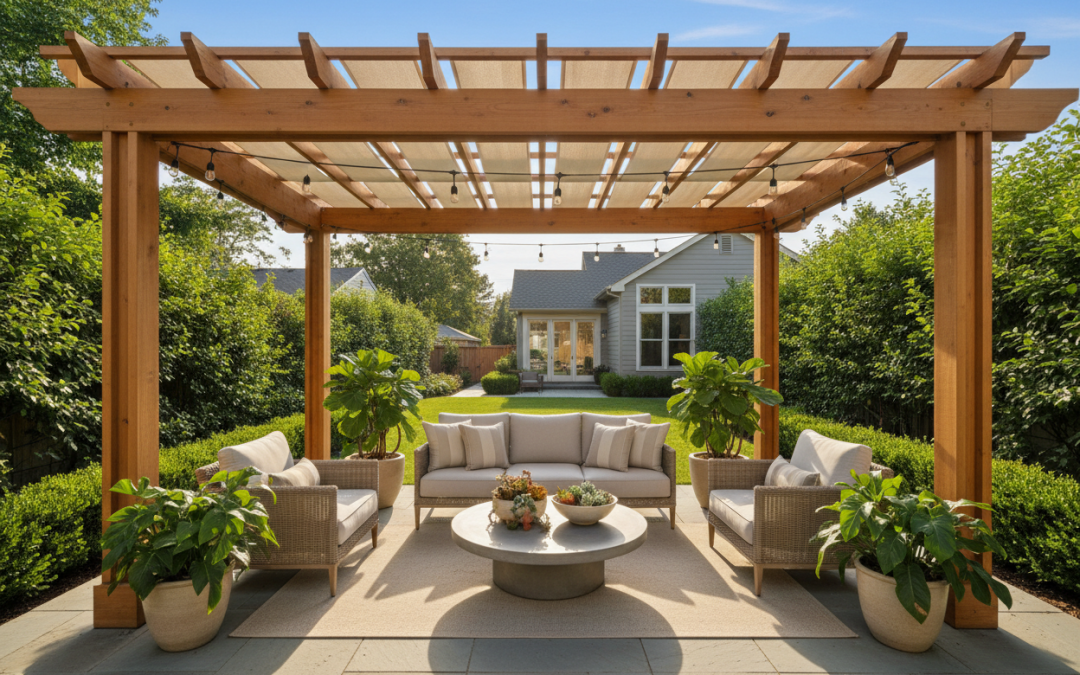
Idea 1: DIY Pergola with String Lights
A pergola might sound like an expensive undertaking, but with some basic carpentry skills and the right approach, you can build one for a fraction of the cost of a professionally installed version. The magic happens when you choose your materials wisely and add the right finishing touches.
Start with pressure-treated lumber from your local home improvement store. Pine or cedar posts work beautifully and cost significantly less than exotic hardwoods. For the frame, you’ll need four posts, crossbeams, and rafters. The beauty of a pergola lies in its open design, which means you’re using less material overall compared to a fully covered structure.
Here’s where the “expensive” look comes in: the details matter enormously. Sand all your lumber smooth before assembly, and consider adding decorative end cuts to your rafters. A simple curved or angled cut can transform basic lumber into something that looks custom-designed. Apply a high-quality stain in a rich color like dark walnut or cedar tone.
The string lights are what truly elevate this project from basic to breathtaking. Invest in warm white LED string lights with a dimmer option. Weave them through the rafters in a pattern that creates even coverage. When evening falls, your pergola will glow with an ambiance that rivals expensive restaurant patios.
Total cost for materials typically ranges from $300 to $600, depending on the size of your patio, compared to $2,000 to $5,000 for a professionally built pergola.
Idea 2: Fabric Sail Shades
Sail shades have gained tremendous popularity in recent years, and for good reason. They offer excellent sun protection, create dramatic visual interest, and can be installed at a fraction of the cost of traditional roofing structures.
The key to making sail shades look expensive lies in the fabric choice and installation method. While you might be tempted to grab the cheapest option available, investing in quality outdoor fabric will pay dividends in both appearance and longevity. Look for solution-dyed acrylic fabrics that resist fading and mildew. Colors like deep navy, charcoal gray, or rich burgundy tend to look more sophisticated than bright primary colors.
Installation is surprisingly straightforward. You’ll need mounting points, which can be existing structures like your house, fence posts, or dedicated poles. The trick to a professional appearance is ensuring proper tension and angles. Sail shades should have a slight slope to allow water runoff, and the fabric should be taut without being overstretched.
Consider layering multiple smaller sails rather than using one large piece. This creates visual depth and allows for more interesting shadow patterns. The layered approach also costs less than a single large custom sail and gives you flexibility to adjust coverage as needed.
Quality sail shades can be purchased for $150 to $400 each, and most patios can be adequately covered with two to three sails. Professional sail shade installations often cost $1,500 to $3,000 or more.
Idea 3: Corrugated Metal Roofing
Don’t let the industrial nature of corrugated metal fool you. When used thoughtfully, this material can create a sleek, modern patio cover that looks like it belongs in an upscale design magazine. The key is in the framework and finishing details.
Modern corrugated metal comes in various colors and finishes. Avoid the basic galvanized silver if you want an upscale look. Instead, opt for colors like charcoal, bronze, or even bold options like forest green or deep blue. Many manufacturers now offer corrugated panels with subtle textures or patterns that add visual interest.
The framework is crucial for achieving a high-end appearance. Use clean, straight lines and ensure all connections are neat and properly sealed. Consider painting the support structure in a complementary color, or for a truly modern look, use black metal posts and trim.
One of the biggest advantages of corrugated metal is its durability and low maintenance requirements. Unlike fabric options, it provides complete weather protection and can last decades with minimal care. The material also offers excellent value, covering large areas for relatively little cost.
To soften the industrial edge, consider adding wooden accents or incorporating plants around the perimeter. Hanging planters or climbing vines can create a beautiful contrast against the metal surface.
Corrugated metal roofing typically costs $3 to $8 per square foot for materials, making it possible to cover a substantial patio area for $500 to $1,200, including basic framing materials.
Idea 4: Bamboo and Reed Screening
Bamboo screening offers an organic, spa-like aesthetic that can transform your patio into a tropical retreat. This option works particularly well for creating partial coverage or privacy screens that also provide shade.
The beauty of bamboo lies in its natural variation and texture. Unlike synthetic materials that can look obviously artificial, bamboo brings authentic character to your outdoor space. You can purchase bamboo screening in rolls, making installation relatively simple for most DIY enthusiasts.
For the most sophisticated look, create a frame system using pressure-treated lumber painted or stained to complement the bamboo. The frame serves both functional and aesthetic purposes, providing secure mounting points while creating clean, finished edges that elevate the overall appearance.
Consider mixing bamboo with other materials for added visual interest. Alternating bamboo panels with open sections creates a rhythm that’s pleasing to the eye while maintaining airflow. You might also incorporate different bamboo products, such as combining screening with bamboo poles for posts or accents.
Maintenance is minimal with quality bamboo products. Occasional cleaning with mild soap and water keeps the material looking fresh, and most bamboo screening is naturally resistant to insects and weather when properly treated.
The versatility of bamboo allows for creative installations. Use it to create cabana-style corners, privacy walls that double as wind breaks, or overhead canopies supported by simple frame structures.
Bamboo screening costs approximately $1 to $3 per square foot, making it one of the most affordable options for creating custom patio coverage. A complete installation including framing materials typically runs $200 to $600.
Idea 5: Repurposed Pallets Structure
Wooden pallets have become the darling of the DIY world, and for good reason. They’re often available for free or at very low cost, and with some creativity, they can be transformed into stunning architectural elements.
The key to making pallet structures look expensive rather than makeshift is in the preparation and finishing. Start by selecting pallets in the best condition possible. Look for heat-treated pallets (marked with “HT”) rather than chemically treated ones, especially for outdoor use where you’ll be spending time underneath the structure.
Proper preparation is crucial. Disassemble the pallets carefully to preserve the wood, then sand all pieces thoroughly to remove rough spots and splinters. This step alone makes an enormous difference in the final appearance. Consider the layout carefully before assembly, planning for both structural integrity and visual appeal.
Staining or painting the pallet wood can completely transform its appearance. Dark stains can make the wood look rich and expensive, while paint allows you to match your existing outdoor decor. For a truly upscale look, consider a two-tone approach with different colors for posts and crossbeams.
Pallet structures work well for pergola-style covers, privacy screens, or even more complex designs like gazebos. The modular nature of pallet construction makes it relatively easy to create custom configurations that fit your specific space and needs.
Add finishing touches like decorative hardware, carved details, or integrated planters to further enhance the custom appearance. These small details are what separate professional-looking projects from obvious DIY attempts.
The primary cost for pallet projects comes from hardware, stain or paint, and any additional lumber needed for reinforcement. Total material costs typically range from $100 to $400, depending on the complexity and size of your project.
Tips for Making Budget Covers Look Expensive
Regardless of which option you choose, certain strategies can elevate any budget project to look far more expensive than its actual cost. These finishing touches and techniques are often what separate amateur projects from professional-looking installations.
First, pay attention to proportions and scale. A common mistake in DIY projects is using materials or dimensions that don’t relate well to the surrounding space. Take time to measure and plan your project so that it feels intentional and properly scaled to your patio and home.
Quality hardware makes a significant difference. Spending a little extra on stainless steel or powder-coated hardware instead of basic galvanized options will improve both appearance and longevity. The hardware is often visible and can either enhance or detract from your project’s overall look.
Consistent finishing is crucial. Whether you’re staining, painting, or sealing your materials, take the time to do it properly. Multiple thin coats always look better than one thick application, and proper surface preparation is essential for professional results.
Consider the integration with your existing outdoor space. Your patio cover should feel like a natural extension of your home and landscape rather than an obvious add-on. This might mean matching existing colors, using complementary materials, or ensuring that sight lines and proportions work harmoniously.
Lighting can transform any structure from basic to beautiful. Even simple solar lights or battery-operated LED strips can add ambiance and visual interest. Warm light temperatures generally look more expensive and inviting than cool white options.
Don’t forget about the details that create a finished appearance. This includes things like properly trimmed edges, consistent spacing, and clean connections. These elements might not be immediately noticeable, but they contribute to an overall sense of quality and intentionality.
Conclusion
Creating a beautiful, custom patio cover doesn’t require a massive budget or professional installation. With the right approach and attention to detail, any of these five ideas can transform your outdoor space into something that looks far more expensive than its actual cost.
The key to success lies in choosing quality materials within your budget, taking time with preparation and finishing, and paying attention to the details that create a polished appearance. Whether you opt for the romantic ambiance of a string-lit pergola, the modern appeal of corrugated metal, or the organic beauty of bamboo screening, your investment of time and creativity will pay dividends in both appearance and functionality.
Remember that outdoor improvements are investments in your quality of life. A well-designed patio cover extends your usable outdoor season, protects your furniture and other outdoor investments, and creates a space where family and friends naturally want to gather.
Start with one of these projects that appeals to your style and skill level. You might be surprised at how much satisfaction comes from creating something beautiful with your own hands while staying well within your budget. Your neighbors might just assume you hired an expensive contractor, and there’s nothing wrong with letting them think that.
Frequently Asked Questions
How long do budget-friendly patio covers typically last?
With proper installation and maintenance, most budget-friendly patio covers can last 5-15 years or more. Fabric options like sail shades may need replacement every 5-8 years, while wooden structures and metal roofing can last much longer with proper care.
Do I need permits for these DIY patio cover projects?
Permit requirements vary by location and project scope. Generally, simple structures like sail shades or temporary covers don’t require permits, while permanent structures like pergolas might. Check with your local building department before starting any project.
What’s the most cost-effective option for large patio areas?
For covering large areas on a tight budget, sail shades or corrugated metal roofing typically offer the best value per square foot of coverage. Both options can cover substantial areas without requiring extensive framework.
Can these covers withstand severe weather conditions?
Weather resistance depends on the specific materials and installation quality. Corrugated metal and properly built wooden structures offer the best severe weather protection, while fabric options should be removable or designed to handle your local weather conditions.
How much can I realistically save compared to professional installation?
DIY installations typically cost 50-75% less than professional options. However, this doesn’t include the value of your time and labor. The savings are most significant on simpler projects like sail shades or basic pergolas.
What tools do I need for these projects?
Most projects require basic tools like a drill, saw, level, measuring tape, and ladder. More complex wooden structures may require additional carpentry tools. Many home improvement stores offer tool rental programs if you don’t own specialized equipment.

Garland TX luxury custom pergolas | Keathley Landscaping

Wylie TX pergolas | Keathley Landscaping

Parker TX outdoor living contractor | Keathley Landscaping

Parker TX luxury custom pergolas | Keathley Landscaping

Dallas TX covered patios | Keathley Landscaping

Rose Hill TX pergola builders | Keathley Landscaping

Preston Hollow Dallas TX covered patio contractors near me | Keathley Landscaping

Plano TX covered patio contractors near me | Keathley Landscaping

Sachse TX custom patio cover builders | Keathley Landscaping

Dallas TX outdoor living contractor | Keathley Landscaping

Dallas TX luxury custom pergolas | Keathley Landscaping

Plano TX pergola companies near me | Keathley Landscaping

Frisco TX outdoor living contractor | Keathley Landscaping

Allen TX pergola companies near me | Keathley Landscaping

Lowry Crossing TX custom patio covers | Keathley Landscaping

Rockwall TX custom pergolas | Keathley Landscaping

Garland TX custom patio cover cost | Keathley Landscaping

Fate TX pergolas | Keathley Landscaping

Richardson TX custom patio covers | Keathley Landscaping

Lavon TX outdoor living space contractors | Keathley Landscaping

Lake Highlands Dallas TX custom patio cover cost | Keathley Landscaping

Sachse TX pergola builders | Keathley Landscaping

Rose Hill TX custom pergolas | Keathley Landscaping

Fate TX outdoor living contractor | Keathley Landscaping

Frisco TX outdoor living space contractors | Keathley Landscaping

Parker TX custom patio covers | Keathley Landscaping

Preston Hollow Dallas TX luxury custom pergolas | Keathley Landscaping

Plano TX pergolas | Keathley Landscaping

cost for sod installation McKinney Texas

price for sod installation Dallas Texas

sod installation near me Highland Park Texas

lawn sod installation near me Highland Park Texas

cost of sod and installation Wylie Texas

price of sod installation Garland Texas

sod installation near me Preston Hollow Dallas Texas

sod installation services Mobile City Texas

sod contractors Lowry Crossing Texas

sod installation near me Rowlett Texas

sod lawn installation Garland Texas

sod installation companies near me Murphy Texas

sod installation company near me Garland Texas

lawn sod installation near me Richardson Texas

installation of sod cost Lucas Texas

sod installation company near me Dallas Texas

cost for sod installation Rockwall Texas

installation of sod cost Preston Hollow Dallas Texas

cost of sod and installation Frisco Texas

price of sod installation Plano Texas

sod installation companies near me Fairview Texas

sod installation services Lucas Texas

sod installation company Sachse Texas

sod installation services Wylie Texas

price of sod installation Lakewood Dallas Texas

sod installation cost Lavon Texas

sod installation cost Dallas Texas

cost of sod and installation Fairview Texas

drain contractor Rowlett Texas

landscape drainage contractor near me Lake Highlands Dallas Texas

drainage company near me Wylie Texas

drainage contractors near me Wylie Texas

drainage contractors near me Preston Hollow Dallas Texas

drainage company near me Sachse Texas

drainage company Allen Texas

drainage solutions near me Lowry Crossing Texas

yard drainage contractors near me Mobile City Texas

drain cleaning Garland Texas

yard drainage specialist near me Highland Park Texas

drainage solutions near me Richardson Texas

drainage Parker Texas

drainage solutions near me Highland Park Texas

yard drainage Dallas Texas

drain Richardson Texas

drainage Richardson Texas

yard drainage contractors near me Frisco Texas

drainage Fate Texas

drain contractor Rockwall Texas

drain cleaning Allen Texas

drain cleaning Lakewood Dallas Texas

landscape drainage McKinney Texas

drain cleaning Parker Texas

landscape drainage contractor near me Lakewood Dallas Texas

drainage solutions near me Murphy Texas

drainage company Rowlett Texas

Recent Comments