
How to Create Multi-Level Custom Patio Covers for Sloped Properties
Table of Contents
1. Introduction
2. Understanding Sloped Property Challenges
3. Planning Your Multi-Level Patio Cover Design
4. Essential Materials and Tools
5. Step-by-Step Construction Process
6. Drainage and Weather Considerations
7. Finishing Touches and Maintenance
8. Conclusion
9. Frequently Asked Questions
Introduction
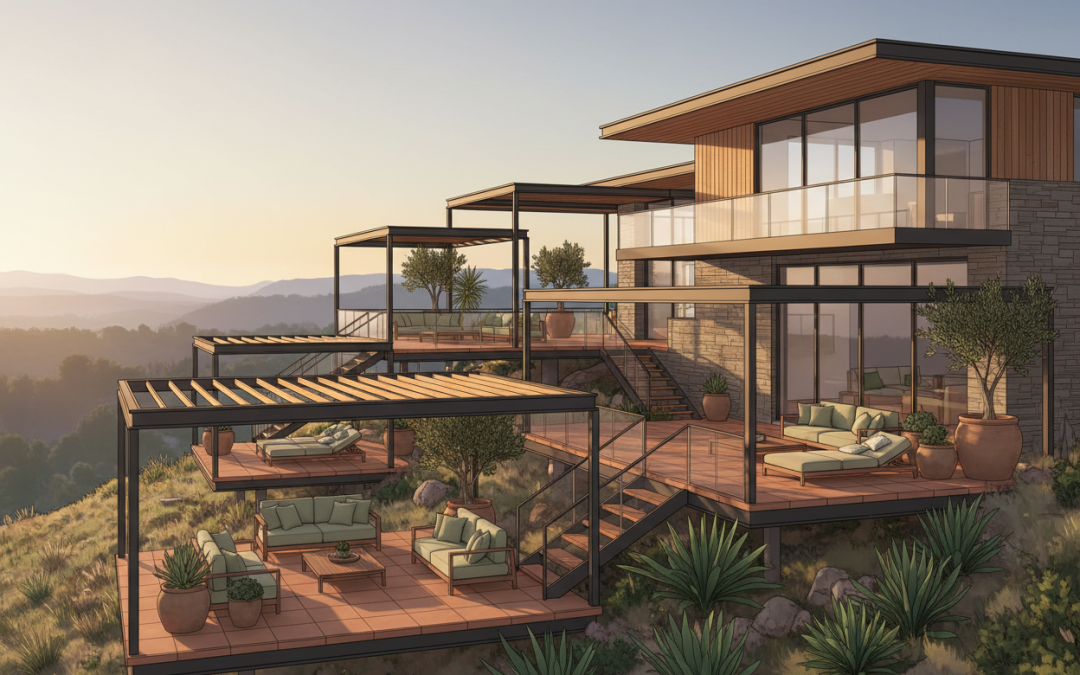
Living on a sloped property presents unique opportunities and challenges when it comes to outdoor living spaces. While flat yards offer straightforward patio cover installations, sloped terrain demands creative solutions that work with the natural landscape rather than against it. Multi-level custom patio covers have become increasingly popular among homeowners who want to maximize their outdoor space while creating stunning visual appeal that complements their property’s natural contours.
Creating a multi-level patio cover on sloped ground isn’t just about aesthetics – it’s about transforming what might seem like a limitation into your property’s greatest asset. These structures can provide shade, protection from the elements, and defined outdoor living areas that flow seamlessly with your landscape’s natural elevation changes.
Whether you’re dealing with a gentle slope or a dramatic hillside, this comprehensive guide will walk you through the process of designing and building custom patio covers that embrace your property’s unique topography. From initial planning to final installation, we’ll cover everything you need to know to create an outdoor space that’s both functional and breathtaking.
Understanding Sloped Property Challenges
Before diving into construction, it’s crucial to understand the specific challenges that sloped properties present. The most obvious issue is the uneven ground, which affects everything from foundation placement to structural support requirements. Water drainage becomes a critical concern, as improper planning can lead to pooling, erosion, or water damage to your structure.
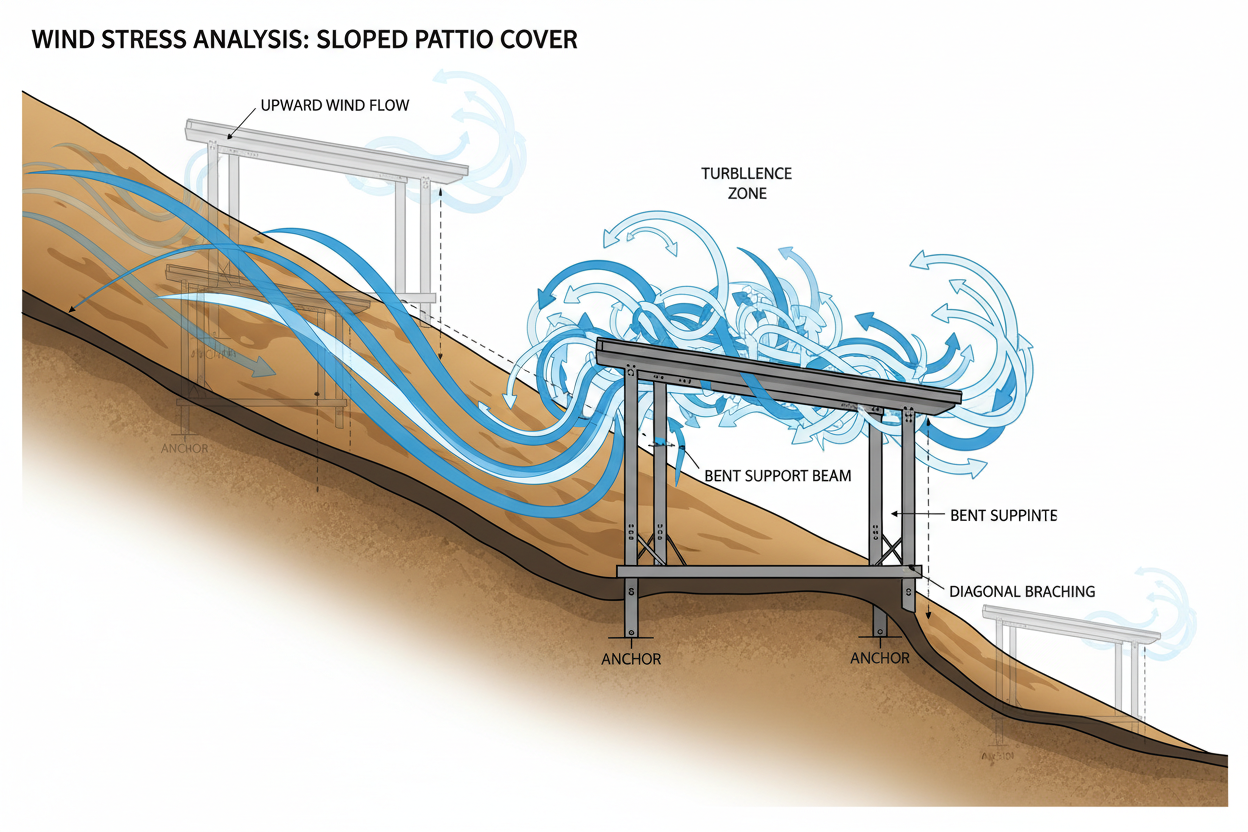
Wind patterns also behave differently on sloped terrain. Updrafts and downdrafts can create unexpected stress on your patio cover, requiring additional bracing and more robust anchoring systems than you’d need on flat ground. The visual impact of your structure changes dramatically with elevation changes too – what looks proportional from one angle might appear overwhelming or underwhelming from another.
Soil stability varies significantly on slopes, with some areas prone to shifting or settling over time. This means your foundation strategy needs to account for potential ground movement, and you may need to incorporate flexible design elements that can adapt to minor shifts without compromising structural integrity.
Access for construction equipment and materials becomes another consideration. Steep slopes might limit the size of machinery you can use, potentially requiring more manual labor or creative material transport solutions. However, don’t let these challenges discourage you – with proper planning, they’re all entirely manageable.
Planning Your Multi-Level Patio Cover Design
Successful multi-level patio cover projects begin with thorough planning that considers both your property’s natural features and your lifestyle needs. Start by conducting a detailed site survey, noting elevation changes, existing vegetation, drainage patterns, and views you want to preserve or block.
Consider how you’ll use each level of your patio cover. The upper level might serve as a dining area with panoramic views, while lower levels could house lounging spaces or outdoor kitchens. Think about traffic flow between levels – you’ll want smooth transitions that feel natural and safe, especially if you plan to entertain frequently.
Climate considerations play a huge role in design decisions. In areas with heavy rainfall, steeper roof pitches and robust guttering systems become essential. Hot climates might call for additional shade elements or ventilation features. Snow loads require stronger structural support and specific roof angles to encourage shedding.
Local building codes and permit requirements vary widely for sloped construction projects. Some municipalities have specific regulations about structures on slopes, including setback requirements, height restrictions, and drainage specifications. Research these requirements early in your planning process to avoid costly redesigns later.
Professional consultation can be invaluable during the planning phase. A structural engineer can assess soil conditions and recommend appropriate foundation systems, while a landscape architect can help integrate your patio cover seamlessly with existing topography and vegetation.
Essential Materials and Tools
Material selection for sloped patio covers requires careful consideration of both structural requirements and aesthetic goals. Pressure-treated lumber remains popular for framing due to its strength, affordability, and resistance to moisture – a crucial factor when dealing with slope drainage issues.
Steel framing offers superior strength and spans longer distances without intermediate support, making it ideal for dramatic elevation changes. However, steel requires proper treatment to prevent corrosion, especially in humid climates or areas with frequent precipitation.
Roofing materials must handle potentially complex angles and drainage patterns. Metal roofing excels on slopes due to its excellent water-shedding properties and ability to span long distances. Polycarbonate panels provide weather protection while maintaining light transmission, creating bright, airy spaces underneath.
Foundation materials depend heavily on your specific soil conditions and local building codes. Concrete footings remain the gold standard for most applications, but helical piers or adjustable post bases might be necessary for challenging soil conditions or areas prone to settling.
Essential tools for sloped construction include a high-quality laser level for establishing accurate elevations across varying terrain, a transit for longer sight lines, and heavy-duty anchoring equipment for securing structures to sloped surfaces. Don’t underestimate the importance of proper safety equipment – working on slopes increases fall risks significantly.
Step-by-Step Construction Process
Begin construction by establishing your primary reference points and elevation markers across the entire project area. This step is absolutely critical for multi-level construction – small errors in initial measurements compound quickly across multiple elevation changes, potentially requiring expensive corrections later.
Foundation installation requires extra attention on sloped sites. Each footing must be perfectly level despite the sloped ground surface, which often means varying excavation depths significantly. Consider stepped foundations that follow the natural slope while maintaining level building platforms for your structure.
Frame construction typically proceeds from the highest elevation downward, allowing gravity to assist with material handling and ensuring proper structural connections between levels. Pay special attention to lateral bracing – slopes create additional stress on structures that flat-ground construction doesn’t experience.
Roof installation becomes more complex with multiple levels and varying angles. Plan your roofing sequence carefully to maintain weather protection as you work, and consider how different roof sections will connect and drain. Proper flashing at level transitions prevents water infiltration that could damage your structure over time.
Throughout construction, regularly verify measurements and elevations. Sloped construction offers fewer opportunities to correct errors after the fact, making accuracy crucial at each step. Take time to double-check critical measurements before committing to permanent installations.
Drainage and Weather Considerations
Effective drainage design separates successful sloped patio covers from problematic ones. Water naturally flows downhill, so your structure must either redirect this flow safely or accommodate it without damage. Consider both roof drainage and ground-level water management in your design.
Guttering systems require careful sizing and positioning for multi-level structures. Upper levels may drain onto lower roof sections, requiring larger gutters and downspouts than single-level calculations would suggest. Plan downspout routes that don’t interfere with lower-level activities or create erosion problems.
Ground drainage around your patio cover prevents water from pooling against foundations or creating muddy conditions under covered areas. French drains, permeable surfaces, and strategic grading help manage runoff effectively while preserving the natural landscape.
Wind load calculations become more complex on slopes due to terrain effects on airflow. Updrafts can create significant uplift forces on roof sections, while downdrafts might create unexpected pressure patterns. Consider these forces when designing structural connections and anchoring systems.
Seasonal weather patterns affect sloped structures differently than flat-ground installations. Snow may slide off upper levels onto lower ones, requiring stronger construction or snow guards. Ice dams can form more readily where roof sections meet, necessitating proper insulation and ventilation strategies.
Finishing Touches and Maintenance
Finishing work on multi-level patio covers offers opportunities to enhance both function and appearance. Lighting design becomes particularly important – different elevation levels create natural opportunities for dramatic lighting effects while ensuring safety for evening use.
Railing and safety features require special attention on sloped installations. Building codes often mandate specific railing heights and spacing for elevated areas, and sloped terrain may require additional safety measures beyond minimum code requirements.
Landscaping integration helps your patio cover look like a natural part of your property rather than an added structure. Consider how plantings can soften structural lines, provide additional privacy, or enhance views from different levels.
Regular maintenance becomes more critical for sloped installations due to increased exposure to weather and drainage challenges. Establish a seasonal inspection routine that checks structural connections, drainage function, and wear patterns that might indicate developing problems.
Cleaning and upkeep procedures should account for the unique challenges of multi-level structures. Plan safe access routes for maintenance activities, and consider how cleaning solutions and debris will flow across different levels during maintenance activities.
Conclusion
Creating multi-level custom patio covers for sloped properties transforms challenging terrain into stunning outdoor living spaces that maximize both function and visual appeal. While these projects require more planning and attention to detail than flat-ground installations, the results justify the extra effort through unique spaces that work harmoniously with natural topography.
Success depends on thorough planning that addresses site-specific challenges, careful material selection appropriate for sloped conditions, and meticulous construction that maintains accuracy across varying elevations. Proper drainage design and weather considerations ensure long-term performance, while thoughtful finishing touches create spaces that feel like natural extensions of your home.
Remember that complex sloped installations often benefit from professional consultation, particularly for structural engineering and local code compliance. Don’t hesitate to seek expert advice when dealing with challenging soil conditions, significant elevation changes, or complex drainage situations.
With careful planning and execution, your multi-level patio cover will provide years of enjoyment while adding significant value to your property. The investment in proper design and construction pays dividends through enhanced outdoor living opportunities and a truly unique landscape feature that celebrates your property’s natural character.
Frequently Asked Questions
Q: How steep can a slope be for patio cover installation?
A: Most patio covers can be installed on slopes up to 30-40 degrees, though steeper installations are possible with proper engineering. Slopes exceeding 25 degrees typically require special foundation systems and additional structural bracing. Always consult local building codes and consider professional engineering consultation for slopes over 20 degrees.
Q: What’s the typical cost difference between sloped and flat patio cover installations?
A: Sloped installations typically cost 20-50% more than comparable flat installations due to additional foundation work, complex framing, and increased labor requirements. Costs vary significantly based on slope severity, soil conditions, and design complexity. Multi-level designs generally fall on the higher end of this range.
Q: Do I need special permits for sloped patio cover construction?
A: Permit requirements vary by location, but sloped construction often requires additional approvals beyond standard patio cover permits. Many jurisdictions require structural engineering stamps for slopes over certain angles, drainage plans, and soil stability assessments. Check with your local building department early in the planning process.
Q: How do I prevent water damage with multi-level patio covers?
A: Proper drainage design is crucial. Install adequate guttering sized for your roof area, ensure proper roof pitches for water shedding, use appropriate flashing at level transitions, and plan ground-level drainage to direct water away from foundations. Regular maintenance of drainage systems prevents most water-related problems.
Q: What’s the best roofing material for sloped patio covers?
A: Metal roofing performs exceptionally well on slopes due to excellent water-shedding properties and ability to handle complex angles. Polycarbonate panels offer weather protection with light transmission, while traditional shingles work well for gentler slopes. Choose materials based on your climate, aesthetic preferences, and structural requirements.
Q: How long does multi-level patio cover construction typically take?
A: Construction timelines vary widely based on project complexity, weather conditions, and permit approval processes. Simple two-level covers might take 2-3 weeks, while complex multi-level installations can require 6-8 weeks or more. Factor in additional time for permit approvals and potential weather delays when planning your project timeline.

Lavon TX custom patio covers | Keathley Landscaping

Richardson TX custom wood pergola | Keathley Landscaping

Lucas TX custom wood pergola | Keathley Landscaping

Lakewood Dallas TX pergola builders | Keathley Landscaping

Sachse TX custom patio cover builders | Keathley Landscaping

Lakewood Dallas TX custom patio covers | Keathley Landscaping

Rowlett TX custom pergolas | Keathley Landscaping

Murphy TX outdoor living space contractors | Keathley Landscaping

Lake Highlands Dallas TX outdoor living space contractors | Keathley Landscaping

Lavon TX pergola builders | Keathley Landscaping

McKinney TX custom patio cover cost | Keathley Landscaping

Richardson TX custom patio cover cost | Keathley Landscaping

Lakewood Dallas TX custom patio cover cost | Keathley Landscaping

Rockwall TX custom patio cover builders | Keathley Landscaping

Highland Park TX custom wood pergola | Keathley Landscaping

Allen TX covered patios | Keathley Landscaping

Dallas TX custom pergolas | Keathley Landscaping

Allen TX pergola builders | Keathley Landscaping

Lake Highlands Dallas TX covered patios | Keathley Landscaping

Garland TX custom patio covers | Keathley Landscaping

McKinney TX outdoor living space contractors | Keathley Landscaping

Dallas TX custom wood pergola | Keathley Landscaping

Fate TX covered patios | Keathley Landscaping

Frisco TX custom patio covers | Keathley Landscaping

Rowlett TX luxury custom pergolas | Keathley Landscaping

Preston Hollow Dallas TX luxury custom pergolas | Keathley Landscaping

Frisco TX covered patios | Keathley Landscaping

Wylie TX custom pergolas | Keathley Landscaping

installation of sod cost Allen Texas

sod installation near me Lake Highlands Dallas Texas

grass installation Richardson Texas

sod installation services McKinney Texas

grass contractor Mobile City Texas

residential sod installation Parker Texas

sod installation cost Fairview Texas

sod contractors Lucas Texas

sod company Dallas Texas

sod grass installation Richardson Texas

sod installation companies near me Garland Texas

lawn sod installation near me Rose Hill Texas

cost of sod installation Lake Highlands Dallas Texas

cost of sod installation Rose Hill Texas

grass installation Rose Hill Texas

sod installation service Plano Texas

cost for sod installation McKinney Texas

cost of sod and installation Sachse Texas

lawn sod installation near me Garland Texas

sod contractors Wylie Texas

sod company Rockwall Texas

price for sod installation Fate Texas

sod installation companies near me Parker Texas

sod installation service Lowry Crossing Texas

sod installation companies near me Rose Hill Texas

sod contractors Allen Texas

sod installation cost Lakewood Dallas Texas

sod grass installation Plano Texas

drainage company near me Mobile City Texas

landscape drain Preston Hollow Dallas Texas

drainage contractors near me Richardson Texas

yard drainage contractors near me Rowlett Texas

drainage company Murphy Texas

drainage solutions near me Fairview Texas

drainage contractors near me Parker Texas

yard drainage contractors near me Plano Texas

drain cleaning Preston Hollow Dallas Texas

drain Lowry Crossing Texas

drain cleaning Lucas Texas

landscape drainage contractor near me Garland Texas

landscape drainage Lakewood Dallas Texas

drain cleaning McKinney Texas

drainage solutions near me Rowlett Texas

drainage contractors near me Rose Hill Texas

yard drainage Lake Highlands Dallas Texas

drainage Preston Hollow Dallas Texas

channel drain cleaning Parker Texas

yard drainage specialist near me McKinney Texas

drainage solutions near me Plano Texas

outdoor drain repair Lucas Texas

channel drain cleaning Plano Texas

outdoor drain repair Highland Park Texas

yard drainage Parker Texas

drain Richardson Texas

drain cleaning company near me Lavon Texas

Recent Comments